
[ad_1]
Artificial intelligence is booming. Generative AI, a subset of AI, has begun to be integrated into various products and services. Some notable features include text to image generation and content generation with natural language prompts. Before you start using generative fill in Photoshop, make sure you update the latest version.
Adobe announced Firefly earlier this year and recently integrated it into Photoshop and Illustrator, with plans for further expansion. This includes features such as generative fill and generative expansion, which improve functionality such as deleting existing objects and changing the background accordingly. This article explains how to start using Generative Fill in the Photoshop web app. Without further ado, let’s take a closer look.
What is Adobe’s Generative AI in Photoshop?
Photoshop has long been a leader in the industry. Research shows that more than 90% of Creative Creator users prefer Adobe products and services. Now that Adobe’s latest AI model, FireFly, has been integrated into Photoshop on the desktop, the company is expanding its AI capabilities. This provides the ability to edit and enhance images using prompts.
Adobe’s generative AI in Photoshop on desktop
You’ve been able to start using Generative AI on your desktop since it became available with the stable release. Update to the latest Photoshop Build V25.0. This product is paid or has a limited trial version. Start by installing Photoshop on Adobe’s Creative Cloud app. From there, download Photoshop by going to Creative Cloud > Apps > Photoshop and install it.
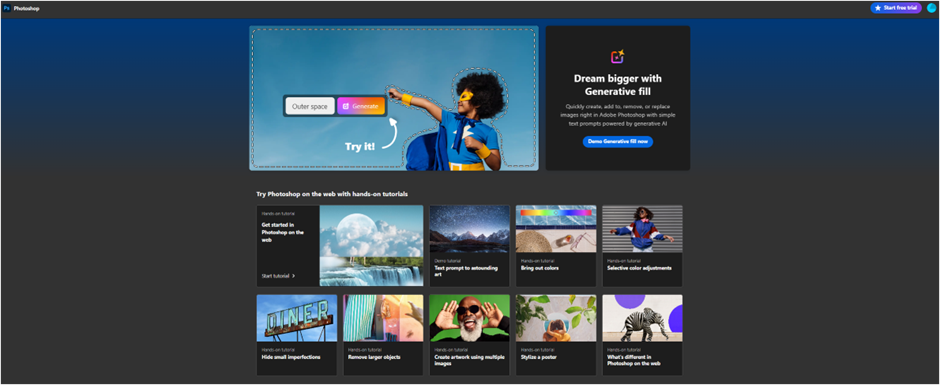
To launch the Generative Fill in Photoshop, which allows users to expand images using AI,
- Open Photoshop and import the image. Then use the selection box on the toolbar.
- Now select the area, including the outside of the image, that you want to expand. To select more, press the Shift key to highlight another area.
- After selecting, click Generative Fill in the context menu. It may also ask you to confirm and agree to the generative AI policy.
- Next, you need to adjust or change the natural language prompt in the text area to enable the generative fill process. If you want to let the AI process itself, leave the text area empty to generate new variations as often as possible.
- Processing it will take some time and we will expand the image accordingly. You will see variations of the image you created using the prompt in the right sidebar.
Adobe’s generative AI in the Photoshop Web App
For users who want to perform basic editing in a few minutes using the Photoshop Web App, here are the following instructions:
- Open the Photoshop Web App and log in to the platform.
- Then click ‘New File’, similar to the desktop app, to use the generative AI with the Photoshop Web App.
- As with Photoshop Desktop, you import the image by dragging and dropping or by browsing the image from your computer.
- Once the image is uploaded, some options will be shown, including AI tools. Then click on “Get started”.
- From the left toolbar, choose the Selection tool and then select the highlighted area to draw the area around the area you want to change.
- Click Generative Fill in the context menu, or write the prompt in natural language and click Generate.
- With the content generated, there are a few variations you can choose from. Depending on your preference, you can choose and also generate more variations by clicking the Plus button.
- You can also use the “Expand Image” option with the Crop tool by expanding the area via the side toolbar and then clicking “Expand Generatively” to generate the image accordingly.
- As for deleting an object, use the selection tools on the toolbar to highlight the object you want to delete or replace with the natural language prompt, then click “Generative Fill” to comply.
AI image generation can be used commercially, thanks to the company using its stock photos to train the Firefly AI model. Adobe has also integrated content authentication for transparency, which is important and welcome news for creatives looking to monetize the platform.
Pronunciation
Before we close Adobe’s FireFly and using the Generative Fill AI, write a descriptive prompt such as “Create”, “Add”, “Change”, etc. This will help the AI better understand what you want it to do . . This includes specifying the preferences you want to make. If you want to know what you want to do, you can leave the text area blank.
The selection tool opens the context menu, where you have the text area to write the prompt and the option to click the Generate button. It supports a few languages, but everything you write will be translated into English as well. So think about what you are looking forward to. Artists can use Generative AI Art, and the content generated by Adobe can be used for commercial purposes, including marketing, product design, and advertising.
However, the content you generate falls under the Content Authenticity Initiative, which means the image will reveal that AI generated it and is significantly different from others due to the database it was trained on. Furthermore, everything it generates is uploaded to the cloud and processed there, which means it requires a stable internet connection and cannot be done offline.